Now you are ready to experiment with the slicer. We will look at the same Deadlock example as in the previous section.
To work with the ready-to-use session that enables the slicer,
click on the Session Manager tool bar button (the left-most button
on the lower tool-bar (labelled Session)).
Now, select and activate the session called DeadlockSlice.
Notice how after activating the session, JJJC, Slicer, and
Checker options on the top tool-bar change color indicating that
those options are enabled.
Close the Session Manager window. At this point you can run the session by clicking on Run option on the top tool-bar or you can take a few steps to take a closer look at the slicer. Let's disable the Checker for a moment and run the session without it.
After you click on the Checker option on the top tool-bar to
disable it, click on the Run option. Bandera will compile
and parse the Deadlock.java again. If you watch the window
where Bandera was invoked you will see the output of the slicer that
begins with words: Building Program Dependence Graph. If you invoke
the slicer when a property has not been specified,
Bandera will slice for deadlock detection. When slicing
for deadlock, Bandera will collect all the constructs in the program
associated with blocking/waiting (e.g., the enter/exit monitor
statements associated with synchronized methods and wait
and notify statements) and these form the slicing criterion.
The resulting slice will consist of all the other statements in the
program that may possibly influence the statements in the criterion.
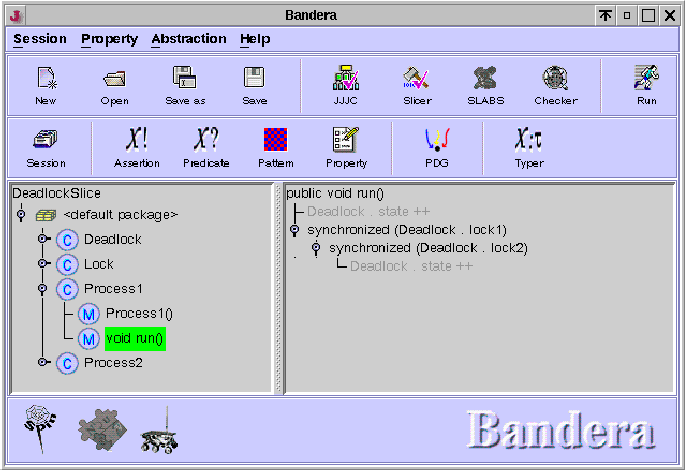
To see the sliced code for the deadlock example in the BUI, click on
the default package node in the left panel of the main frame. Display the
code for the run method of one of the processes by expanding
the run method of, let's say, Process1 class. You
should have a picture in front of you as shown in
Figure 7.
Although no classes were eliminated in the slicing phase, in the
run method of Process1 (and Process2), you can
see that the slicer eliminated the update to the variable
Deadlock.state (code that the slicer removes is displayed in
red, the user can change the color settings in the .banderarc
file in the
.bandera directory created after the invokation of Bandera as explained
in Section 3) since
this variable's value does not influence the blocking behavior of the program.
Figure 7: Deadlock Sliced
Now you can finish running this session by enabling the Checker option and clicking on the Run option. As before, you will see the Counter-example windows pop up. You can step through the counterexample as before.
Note that while in the previous session the counter-example trace had 12 steps, in this session the counter-example trace has only 10 steps. The slicer eliminated some of the irrelevant to the deadlock property statements and therefore made the error trace shorter as the program counter bar always steps over the statements that have been sliced away. This shows how the slicer can contribute to making the model more compact and the error trace shorter and therefore easier to analyze.