Deploying a Web Application to Oracle Application Server
10g
In this tutorial, you use Oracle JDeveloper 10g to
deploy a Web application to Oracle Application Server 10g or a standalone
OC4J.
30 minutes
The tutorial covers the following topics:
 Place
the cursor over this icon to load and view all the screenshots for this tutorial.
(Caution: This action loads all screenshots simultaneously, so response time
may be slow depending on your Internet connection.)
Place
the cursor over this icon to load and view all the screenshots for this tutorial.
(Caution: This action loads all screenshots simultaneously, so response time
may be slow depending on your Internet connection.)
Note: Alternatively, you can place the cursor over
an individual icon in the following steps to load and view only the screenshot
associated with that step. You can hide an individual screenshot by clicking
it.
In the tutorial, you use JDeveloper to create a deployable
J2EE web archive that contains your application and a few required deployment
descriptors. You deploy the application to Oracle Application Server 10g
using the JDeveloper deployment mechanism. You can then test the application
and view its performance by using Oracle Enterprise Manager.
After the application is completed and works as planned, the
next step is to deploy it to a location where customers can use it.
The general steps to deploy an application to any application
server are basically the same. The differences come from the specific connection
requirements of the server.
JDeveloper has the built-in capability to deploy applications
to a number of application servers. In this tutorial, you deploy your application
to a standalone instance of OracleAS Containers for J2EE (OC4J).
Back to Topic List
Before starting the tutorial, you should:
Back to Topic List
Back to Topic
List
Start the Application
Server
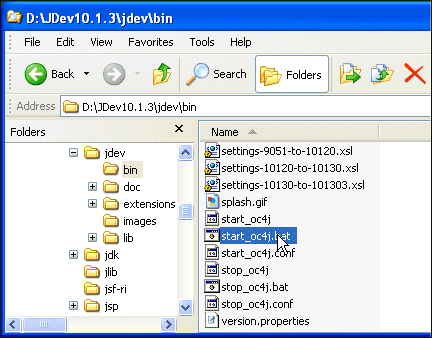
Oracle JDeveloper includes a standalone application server
(standalone OC4J). The following steps describe the way to work with
standalone OC4J.
| 1. |
Open the <jdev_home>\jdev\bin
directory on your system, and double-click the start_oc4j.bat
file to launch the standalone oc4j application server.
|
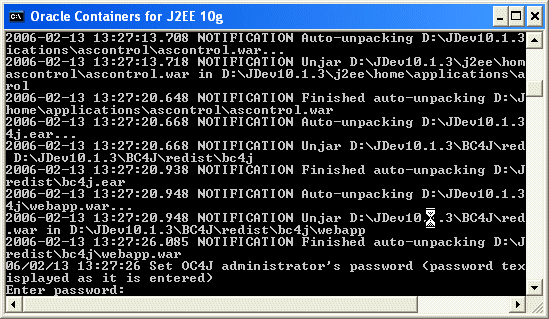
| 2. |
If this is the first time you have run OC4J,
it automatically installs and prompts you for a password for the administrator
account. The administrator account is oc4jadmin.
Enter the password welcome.
|
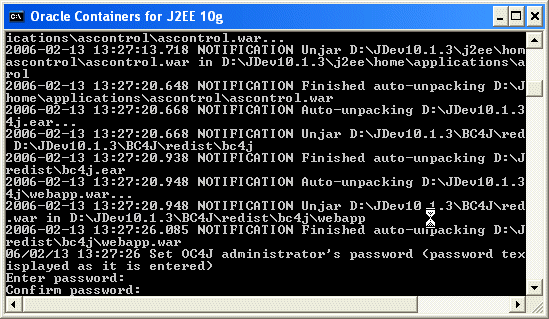
| 3. |
The installation asks you to confirm the password
by entering it a second time.
|
| 4. |
When the install and startup are complete, you
will see the following message:
Oracle Containers for J2EE 10g <10.1.3.0.0> initialized
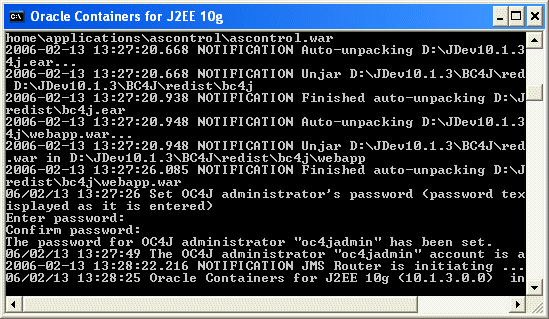
Once ready, leave the command window open. OC4J is now
running and ready for use.
|
Back to Topic
Back to Topic
List
Connect
to Standalone OC4J using Enterprise Manager
Oracle Application Server 10g comes with a browser-based Enterprise
Manager (EM). Through this EM interface, you can monitor activities
and applications deployed to the application server. After the application
server is running, you can connect to EM using a browser. The next few steps
open this interface and briefly explore the application server. The standalone
OC4J that comes with JDeveloper also includes Enterprise Manager.
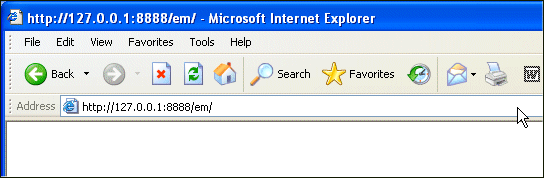
| 1. |
Open a browser of your choice (Firefox, Internet Explorer,
or another browser) and enter the following address: http://127.0.0.1:8888/em.
If you are not using standalone OC4J, the address is : http://127.0.0.1:7777/em
|
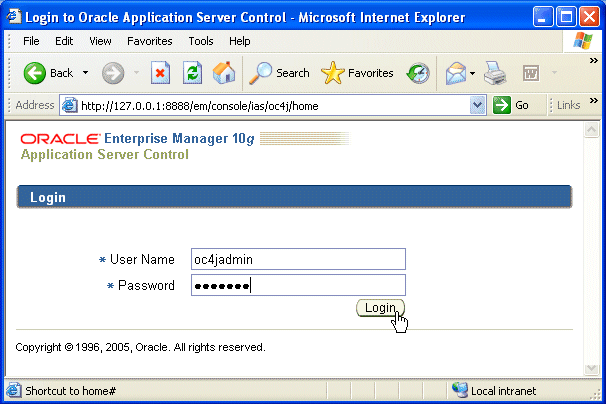
| 2. |
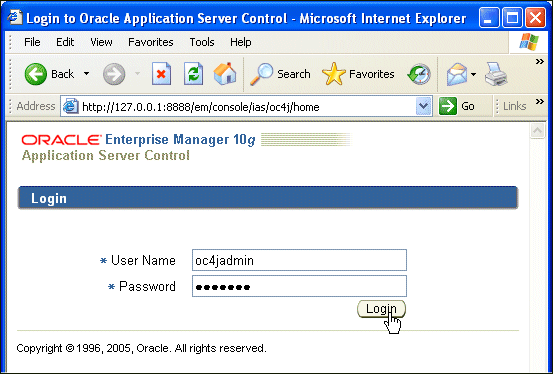
Enterprise Manager 10g prompts you for
a username and password. The username is oc4jadmin with
a password of welcome (or your administrator password).
Click Login to enter EM.
|
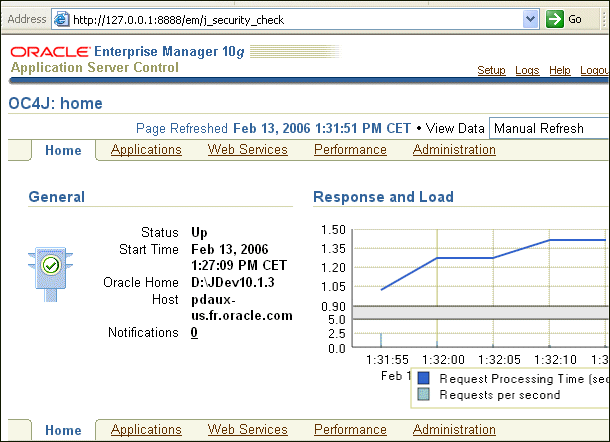
| 3. |
After successful login, the browser looks like
the following:
|
| 4. |
You can now explore applications, Web services, and
other components of Oracle Application Server 10g.
|
| 6. |
Click the Applications link to see which applications
are loaded and running.
|
| |
Close the browser window.
|
Back to Topic
Back to Topic
List
Install the
Required Application and Start
JDeveloper
Before starting the tutorial, you should:
| 1. |
Right-click the following link
to download the predefined application. Save the OrderEntry.zip
file locally on your system. (i.e. c:\temp)
|
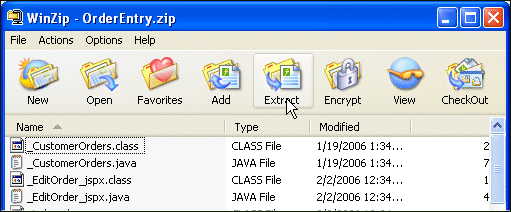
| 2. |
Double-click the OrderEntry.zip file
you just downloaded and click the Extract icon.
|
| 3. |
Specify the folder where to extract the file (i.e.<jdev_home>\jdev\mywork)
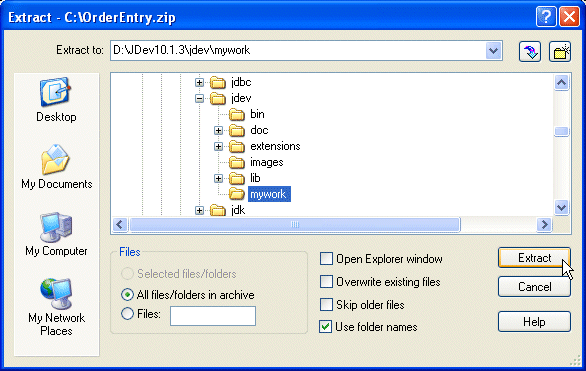
|
| 4. |
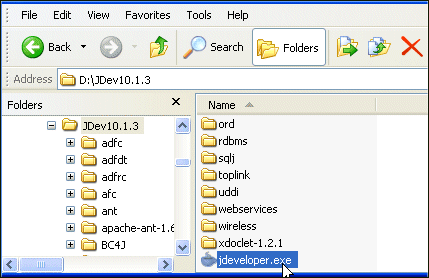
Start JDeveloper. Double-click the JDeveloper executable
(jdeveloper.exe)
found in the root directory where you unzipped it.
If the Migrate User Settings dialog box opens, click NO.
Close the Tip of the Day window.
|
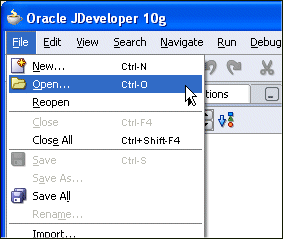
| 5. |
Click the Applications tab and from the Menu select File > Open
|
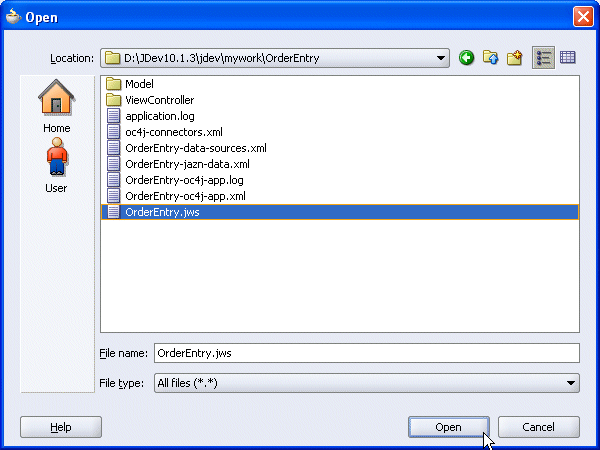
| 6. |
Navigate to <oracle_home>\jdev\mywork\,
select the OrderEntry.jws file and click Open.
|
| |
The application is now loaded into JDeveloper.
|
Back to Topic
Back to Topic List
Back to Topic
List
Creating a Database
Connection
Java Database Connectivity (JDBC) is a standard application
programming interface (API) that is used for connecting a Java application
to
relational databases. JDeveloper uses a connection navigator to maintain connection
information for your application. The connection navigator makes it easy to
create, manage, and test database connections.
If you haven't already created a JDBC connection to the OE
schema, then perform the following steps:
|
1.
|
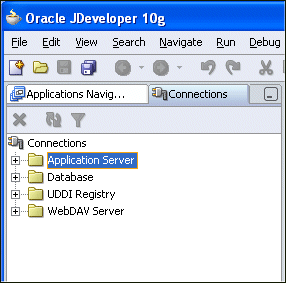
Click the Connections tab on the Applications
Navigator. If the Connections tab is not showing, choose View > Connection
Navigator from the JDeveloper main menu.

|
|
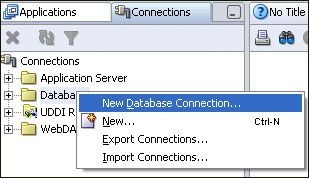
2.
|
Right-click the Database node and choose New Database Connection
from the context menu.
|
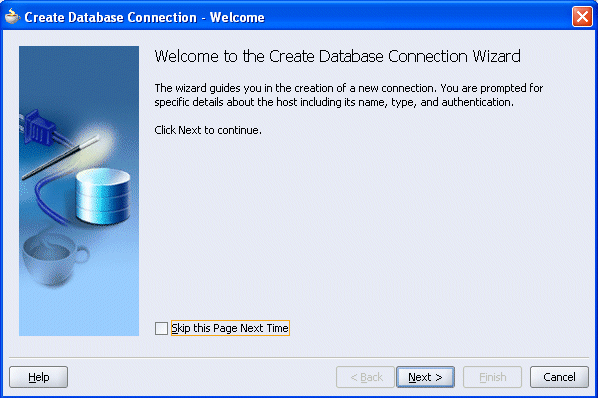
| 3. |
In the Create Database Connection Wizard, review the information on the
Welcome page and then click Next.
|
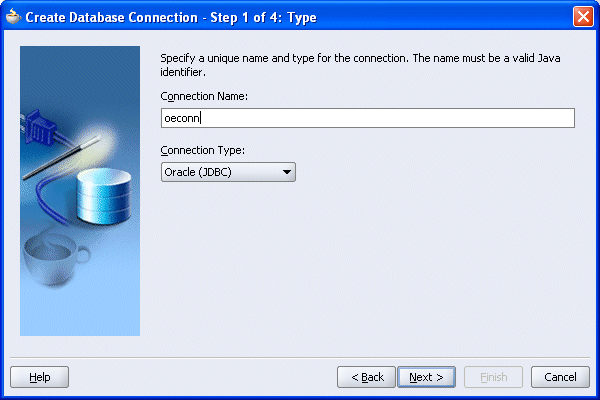
| 4. |
In the Connection Name field, enter oeconn.
Click Next to continue.
|
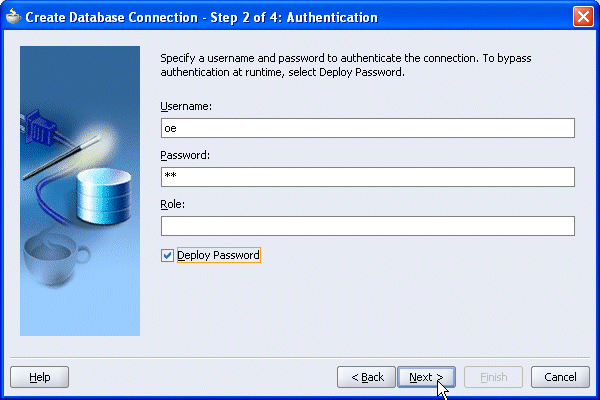
| 5. |
On the Authentication page: enter oe in
the Username field and oe
in the Password field. Select Deploy password.
Note: It is secure to deploy the password since
it gets encrypted.
Click Next to continue.
|
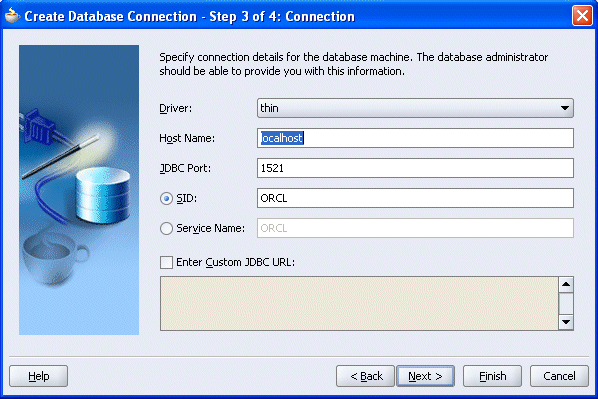
| 6. |
On the Connections page, the default values for the connection should be the following:
Driver: thin
Host name: localhost
JDBC Port: 1521
SID: ORCL
Leave the fields set to these default values.
Click Next to continue.
|
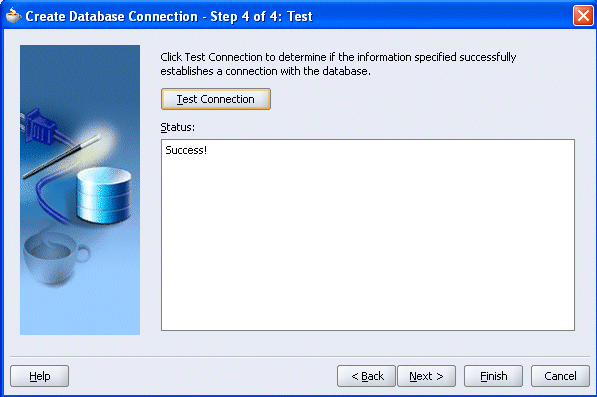
| 7. |
Click Test Connection. If the database is
available and the connection details are correct, you see the word Success! displayed in the
Status window.
If an error occurs, verify the connection settings, click Back to
make any necessary changes, and then retest the connection.
If the connection is successful, click Finish to complete the
connection.
|
| |
You have just created a connection to the database that will supply
data for the application you deploy in this tutorial.
|
Back to Topic
Back to Topic List
Creating an Application Server
Connection
The differences between creating a connection to Oracle Application
Server 10g are fundamentally the same as creating a connection to standalone
OC4J. There are only a few differences in the arguments you supply.
|
1.
|
Click the Connections tab on the
Applications Navigator. If the Connections tab is not showing, choose View > Connection
Navigator from the JDeveloper main menu.
|
|
2.
|
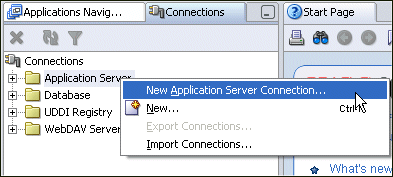
Right-click Application Server in the Connections window
and select New Application Server Connection from the
context menu.
|
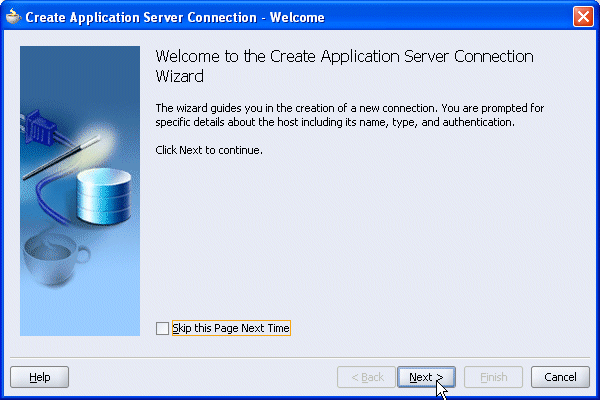
| 3. |
Click Next to skip the Welcome page of the Create Application Server
Connection Wizard .
|
| 4. |
In step 1, name the connection OC4J and choose
Standalone OC4J 10g 10.1.3
Then Next
Note: In case you're not connecting to the standalone OC4J server,
select the appropriate connection type from the drop down list.
|
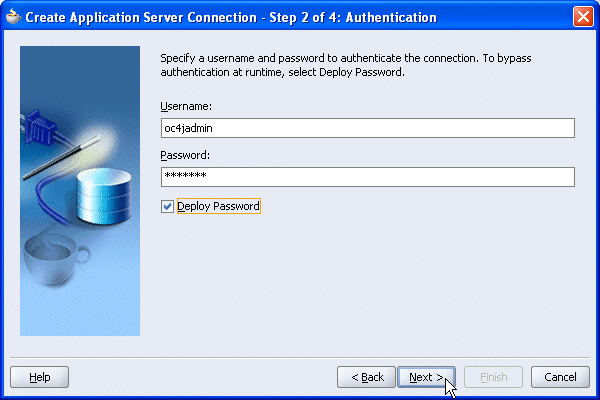
| 5. |
In Step 2, enter oc4jadmin as the username and welcome as
password.
Click Next to continue.
|
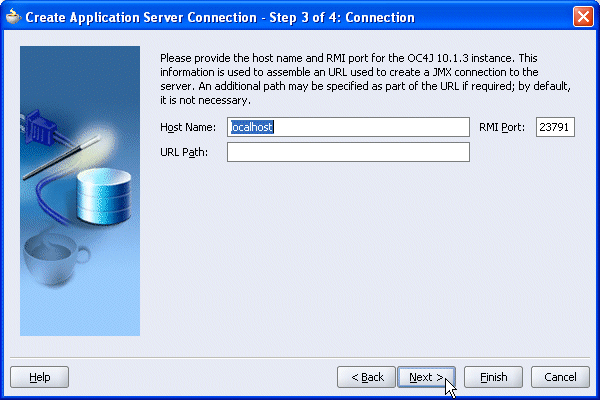
| 6. |
In Step 3 Enter localhost as the Host Name
Click Next to continue.
|
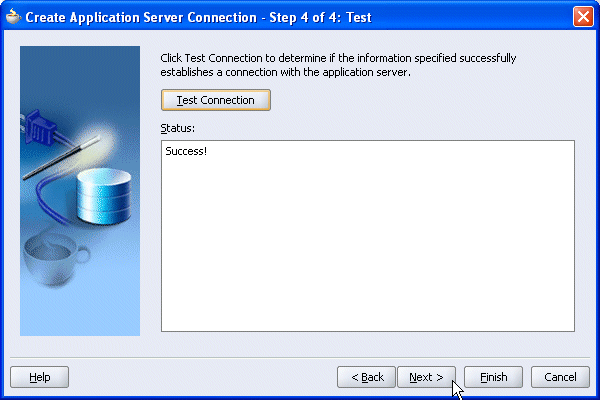
| 7. |
In Step 4 click Test Connection.
If the application server is available and the connection details
are correct, you see the word Success! displayed
in the Status window.
If an error occurs, verify the connection settings, click Back to
make any necessary changes, and then retest the connection.
If the connection is successful, click Finish to complete
the connection.
|
| |
You have just created a connection to the application server that
will host the deployment of your application.
|
Back to Topic
Back to Topic
List
Testing the Application
Prior to deploying your application, you test it with the
embedded OC4J server.
To do this, perform the following steps:
| 1. |
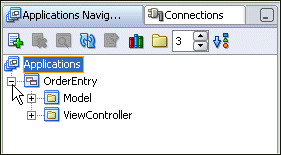
Click the Applications Navigator tab, and expand the OrderEntry node.
|
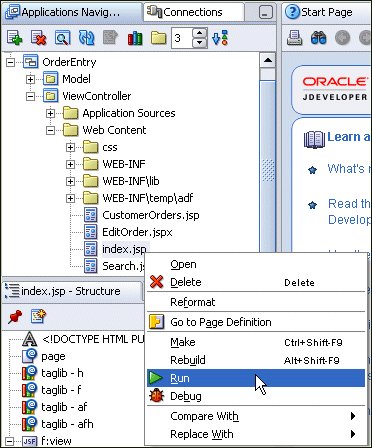
| 2. |
Right-click index.jsp in ViewController >
Web Content > WEB-INF\temp\adf and select Run
from the context menu.
|
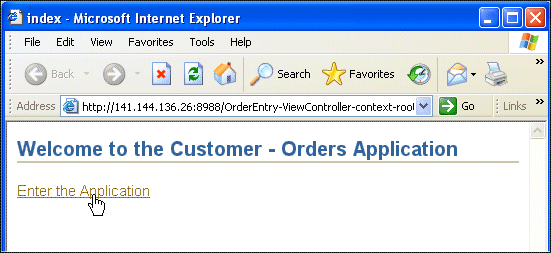
| 3. |
The index page displays in your default browser. Click the link to
enter the application.
|
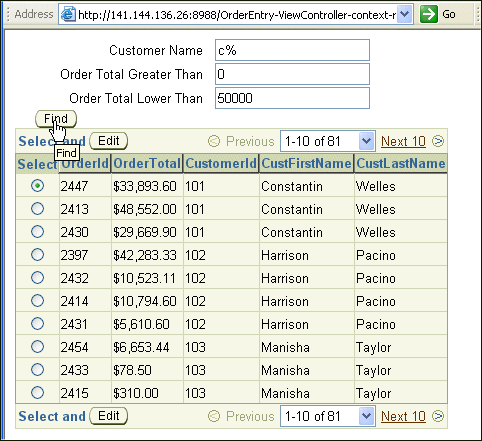
| 4. |
In the search page, you can specify search criteria to query customers
having a specific string in either first or last name and having a
total
order comprised between low and high values that you can specify.
Then click
Find to execute the query.
|
| 5. |
In the detail part, select a row and click the Edit button.
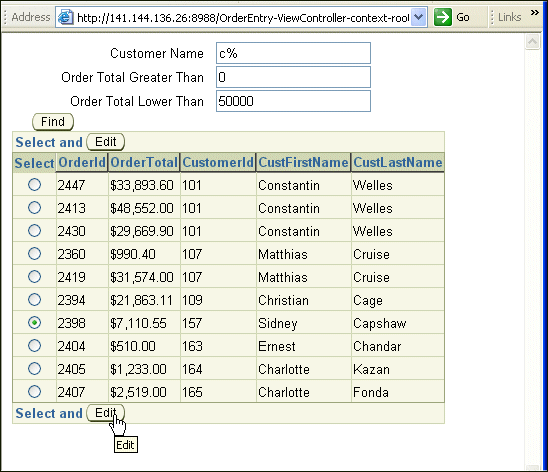
|
| 6. |
The edit page displays detail for the selected record.

|
| |
Close the browser window.
|
Back to Topic
Back to Topic
List
Deployment profiles are project components that manage the
deployment of an application. A deployment profile lists the source files,
deployment descriptors (as needed), and other auxiliary files that will be
included in a deployment package.
There are three parts of the deployment package for the service request application:
The Model project (.jar), the ViewController project (.war), and the Deployment
project (.ear.) files. You create deployment profiles for each of the three
parts in this section of the tutorial.
Back to Topic List
Deploying the Model Project
The first deployment profile you create is for the Model
project. The contents of this project are primarily the Java classes that make
up the data model portion of the application. The deployment type for this
project is a JAR (Java Archive) file.
To do this, perform the following steps:
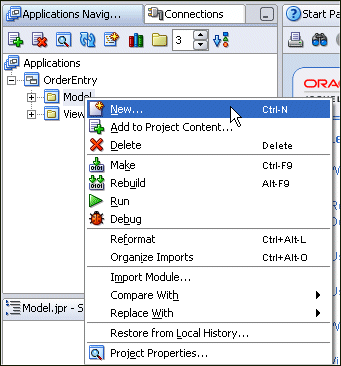
| 1. |
Return to JDeveloper. In the Applications Navigator, right-click OrderEntry
> Model and select New from the context
menu.
|
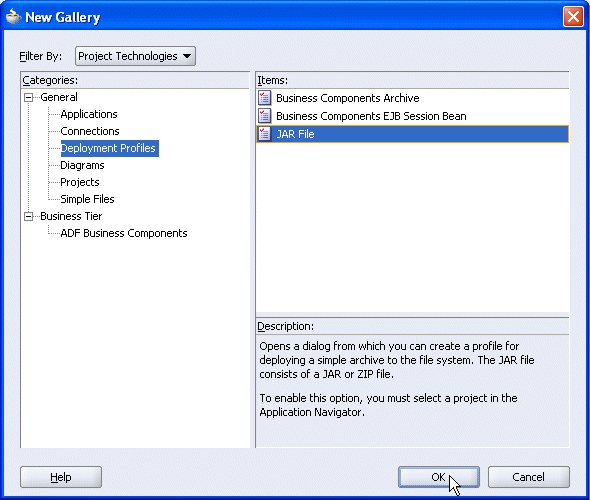
| 2. |
In the New Gallery, in the Categories pane, select General
> Deployment Profiles then select the JAR File
Item.
Click OK.
|
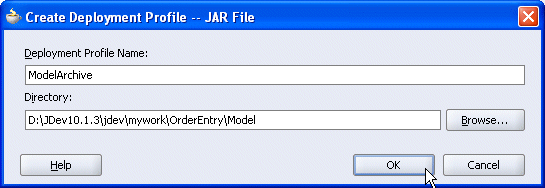
| 3. |
In the Deployment Profile, change the Deployment Profile Name to
ModelArchive,
Click OK
|
| 4. |
In the JAR Deployment Profile Properties leave the default options,
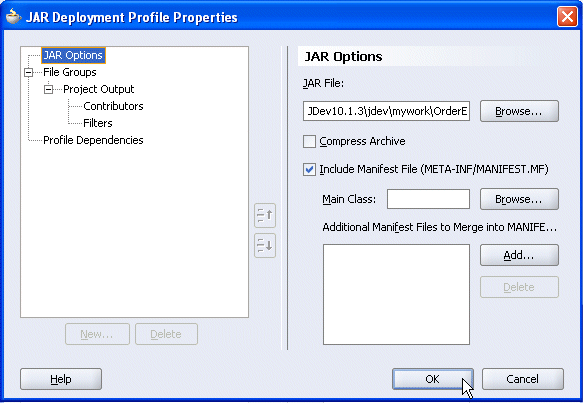
Click OK.
|
| 5. |
A new entry appears in the Applications Navigator.
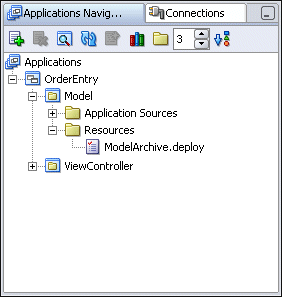
|
| |
Click the Save All  icon
on the JDeveloper menu bar, or select File > Save All from
the menu. icon
on the JDeveloper menu bar, or select File > Save All from
the menu.
|
Back to Topic
Back to Topic List
Deploying the ViewController
Project
The second deployment profile you create is for the ViewController
project. This project is where you created the user interface components
of the application. The deployment file for this project is a .war file (Web
Archive,
for the Web components).
To do this, perform the following steps:
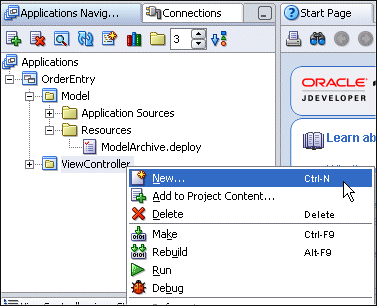
| 1. |
In the Applications Navigator, right-click the ViewController
node and select New in the context menu.
|
| 2. |
In the New Gallery, select Deployment Profiles as
the Category and choose WAR File as the item.
Click OK.
|
| 3. |
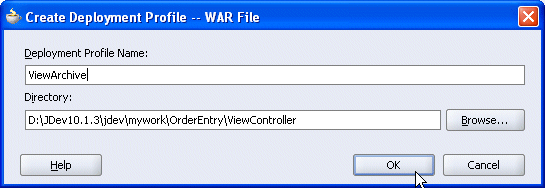
In the Deployment Profile, change the Deployment Profile Name to
ViewArchive.
Then OK
|
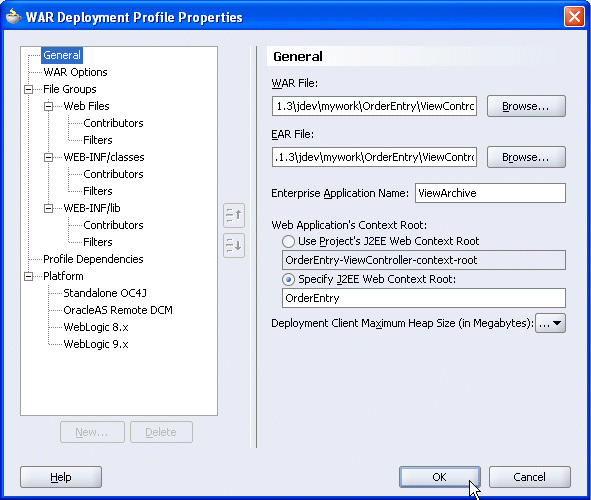
| 4. |
In the WAR Deployment Profile Properties select the General node
then in the Web Application’s Context Root, select the Specify
j2EE Web Context Root option and enter OrderEntry.
Click OK
|
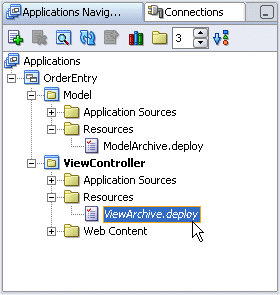
| 5. |
A new entry appears in the Applications Navigator.
|
| |
Click the Save All icon
on the JDeveloper menu bar, or select File > Save All from
the menu.
|
Back to Topic
Back to Topic List
Creating a Deployment Project
To keep all the elements of your application organized and
cleanly separated, you will create a project to hold all of the deployment
components for your application. This project will hold the deployment profiles
and the deployment files (.ear, .war, .jar). The approach of creating a deployment
project is convenient and offers a better separation of
application code and deployment
settings but is not necessarily needed.
Now that you have created the .jar and.war (Web
Archive) files, you can assemble the application into a deployable
package. In the assembly part of deployment, you create a deployment
profile that includes any .jar and .war files you need for your
application, along with other server configuration files that may be
required like the data-sources.xml
file.
In some cases you may also want to add a
jazn-data.xml file i.e. for testing reasons or when the user
population is small and it makes sense to deploy a pre-configured
jazn-data.xml file. Therefore, using OID or a 3rd party LDAP server that can
be configured through Enterprise Manager is a better choice for production
systems.
If there are any OC4J specific deployment
files needed in an application, they need to be added to either the
model project (in the EJB case) or the web application project. For the
sake of having a portable ear file, recommendation is to do all the OC4J
specific configurations in the EM console after deployment.
| 1. |
In the Applications Navigator, right-click the OrderEntry
node and select New Project from the context menu.
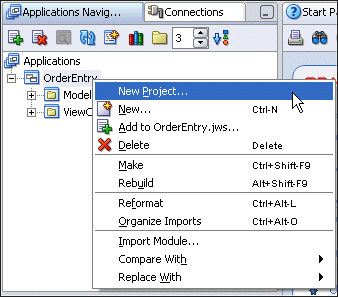
|
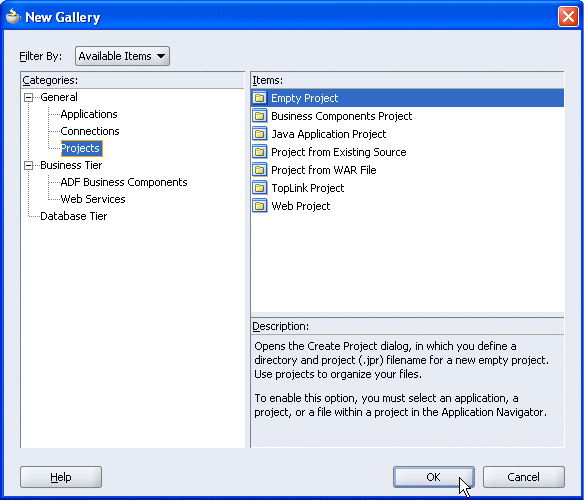
| 2. |
In the New Gallery, click General > Projects and
select Empty Project.
Click OK
|
| 3. |
In the Create Project dialog, enter Deployment as the project
name.
|
| 4. |
Right-click the new Deployment project in the Applications
Navigator and select New.
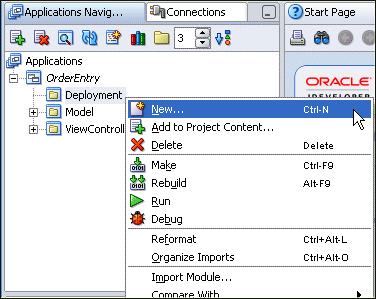
|
| 5. |
Select Deployment Profiles and click
the EAR File option.
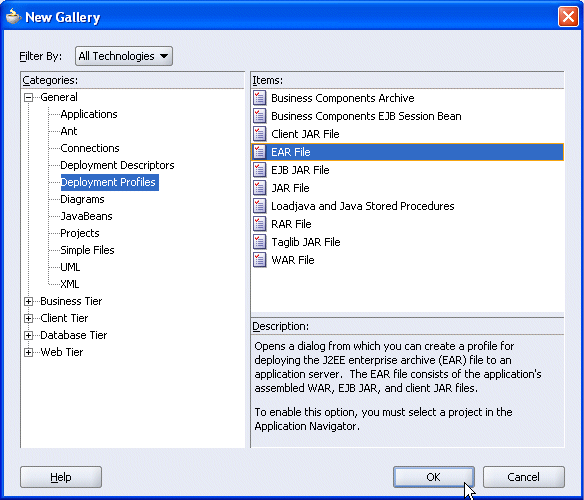
Click OK.
|
| 6. |
Enter OrderEntryApplication as the Deployment Profile
Name.
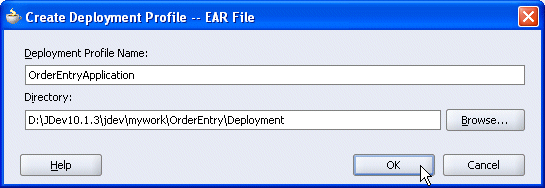
Click OK
|
| 7. |
In the EAR Deployment Profile Properties, select
the Application Assembly node. Then select all the selectable check
boxes.
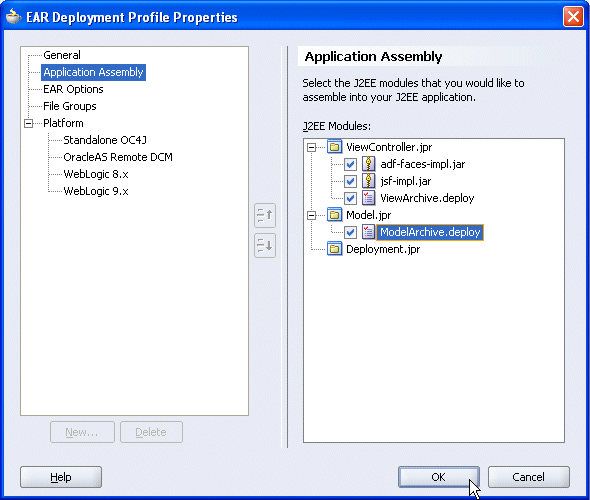
Click OK
|
| 8. |
A new entry appears in the Applications Navigator.
|
| 9. |
Click the Save All
icon on the JDeveloper menu bar, or select File > Save All from
the menu.
|
Back to Topic
Back to Topic List
Back to Topic List
Deploying
the Application in the Application Server
JDeveloper provides a one click option to deploy an application
to an application server. After you have assembled the application into an
EAR file, you can right click the deployment profile and select the target
application server.
To deploy the application, perform the following steps:
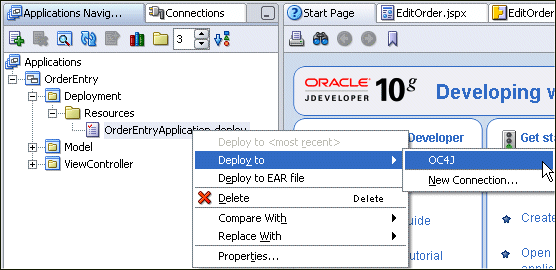
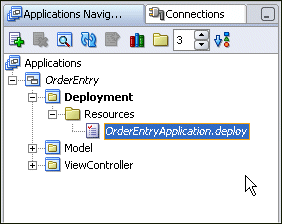
| 1. |
Right-click the OrderEntryApplication.deploy node
in the Applications Navigator and select Deploy to > OC4J
(which is the name of the connection you created earlier)
|
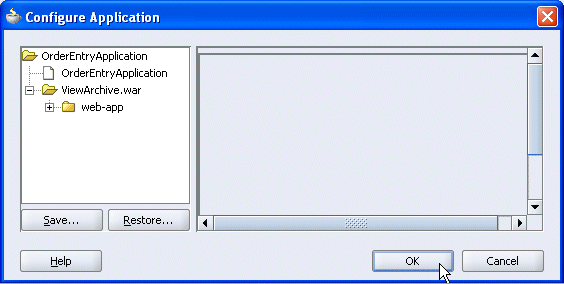
| 2. |
In the Configure Application dialog, click OK to accept
all defaults.
Note: During deployment, JDeveloper re-creates the .jar
and .war files and then assembles the .ear file. After the file is assembled,
JDeveloper deploys the file and unpacks it in a directory on the application
server, depending on the target environment.
|
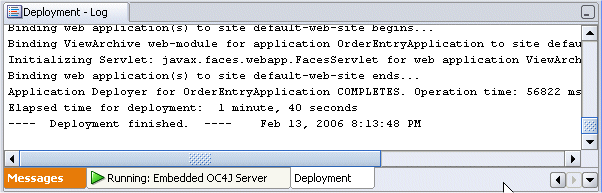
| 3. |
Open the log window if not already opened and check that deployment
was successful.
|
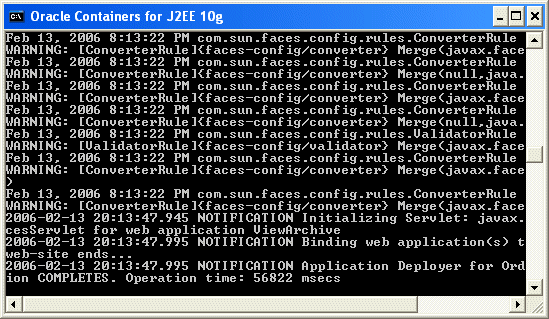
| 4. |
Open the command window where you started OC4J, you can see
that the deployment was performed.
|
Back to Topic
Back to Topic List
Managing the Application Server
| 1. |
Open a browser window an type the following URL http://127.0.0.1:8888/em/
to open the Enterprise Manager console. Note If you are not using standalone
OC4J, the address is : http://127.0.0.1:7777/em
|
| 2. |
Login using oc4jadmin/welcome and click Login.
|
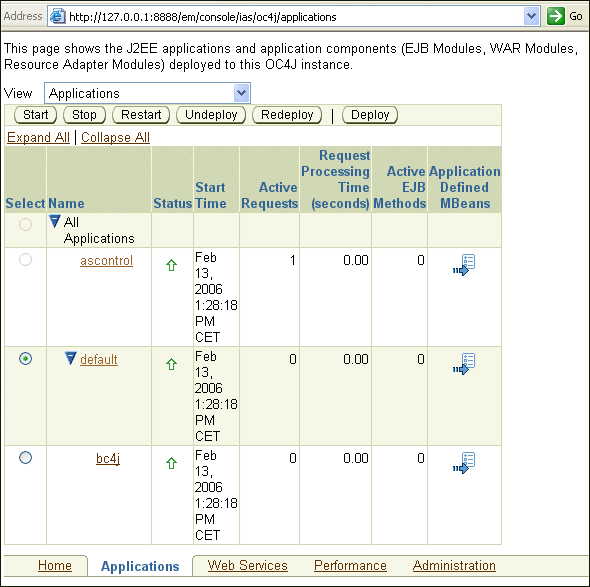
| 3. |
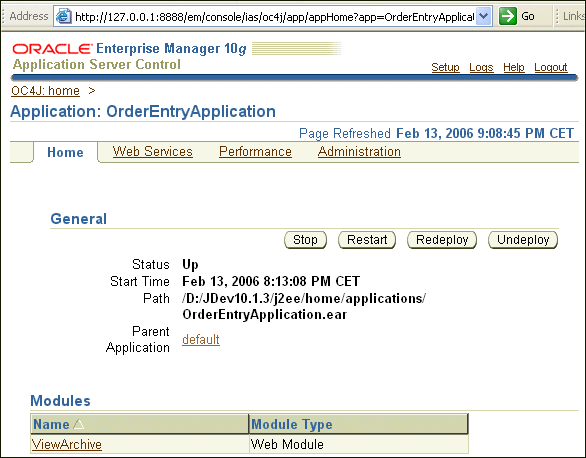
On the Home page, click the Applications link. You should
be able to see the application you just deployed in a running status.
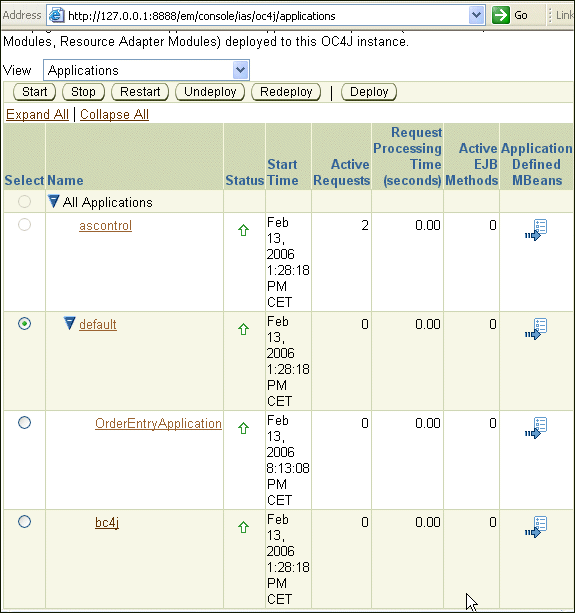
Click the OrderEntryApplication link to provide access
to the Application Administration page.
|
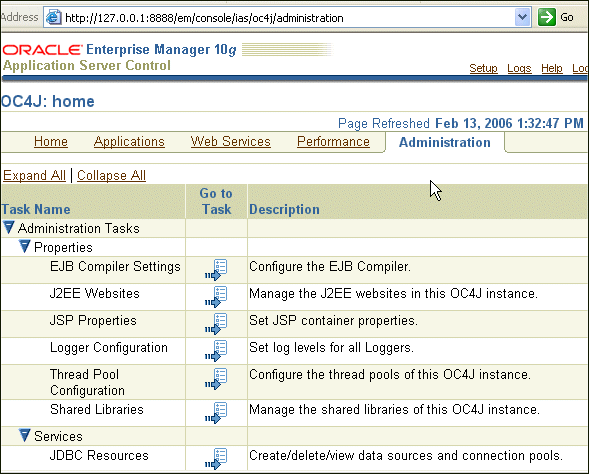
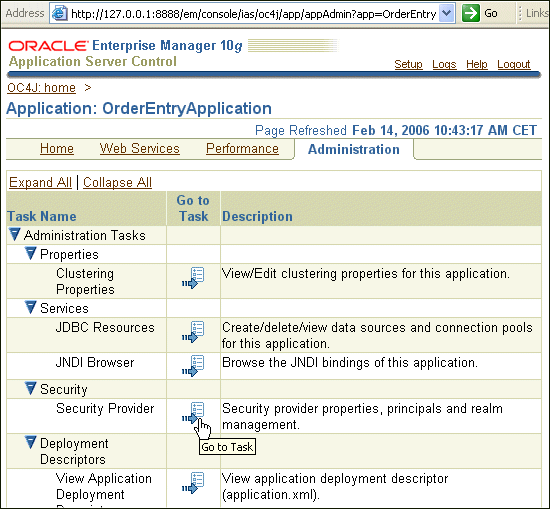
| 4. |
Click the Administration link.
|
| 5. |
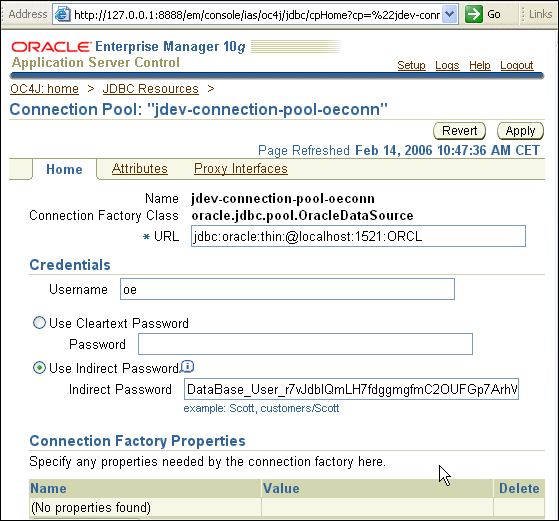
You can review what services have been created during deployment. Click
Go To Task for the JDBC Resources
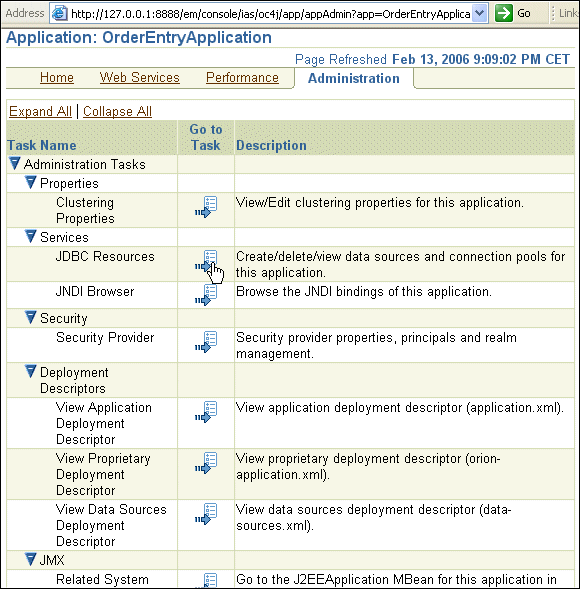
|
| 6. |
Applications deployed to Oracle Application Server 10g or standalone
OC4J use a data source and connection pool to manage database access.
You should be able to see the Data Sources and the
Connection Pools entries created for the OrderEntryApplication.
Select the jdev-connection-pool-oeconn in the
Attributes Connection Pool column.
|
| 7. |
You can review the connection parameters. Notice that the password for
oe is not visible.
Click the Back button twice.
|
| 8. |
In the Administration page, select the Security link.
|
| 9. |
This is the page where you set security rules for your deployed applications.

Close the Browser window.
|
Back to Topic
Back to Topic List
Now that you've deployed the application, you can run it from
the application server.
The next few steps take you through the testing process.
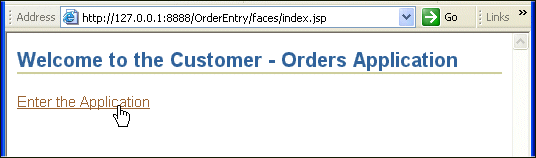
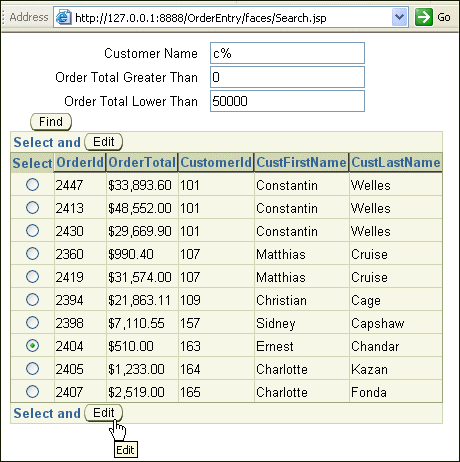
| 1. |
Open a Browser window and enter the following URL: http://127.0.0.1:8888/OrderEntry/faces/index.jsp,
click the Enter the Application link.
|
| 2. |
Reenter search criteria and click Find to execute
the query.vc
|
| 3. |
Select a row from the order list and click Edit
|
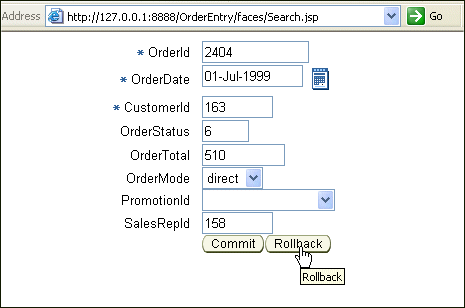
| 4. |
The edit page displays the Order detail.
|
| |
Close your browser window. You've successfully deployed a predefined
application in Oracle Application Server, and tested it.
|
Back to Topic List
In this tutorial, you started the OC4J server, then you created
deployment profiles for a predefined application, and then you deployed the
application in standalone OC4J. Finally, you tested the application and reviewed
the Administration page of the application server using Enterprise Manager.
You learned how to:
 |
Start the environment
|
|
Create connections and test the application
|
|
Create deployment profiles
|
|
Deploy the application and manage the application server
|
|
Run the application
|
Back to Topic List
Place the cursor over this icon to hide all screenshots.
|