If you want to work along with this material we suggest using the MSW Logo environment. It is freely available.
We can use Logo commands to tell the turtle how to move.
There are two basic turtle movement commands:
   forward 100
   backward 100
You can use any number of steps you like. You can also abbreviate commands, e.g.,
forward as fd and
backward as bk.
We can tell the turtle to turn. We ask it to turn
either right or left and
tell it how far to turn in terms of degrees. There are 360 degrees
in a circle so we tell the turtle to turn between 1 and 360 degrees.
   right 90
   left 90
You can also abbreviate commands, e.g.,
right as rt and
left as lt.
Sometimes we want to start over on a clean screen the command for this is.
cs (clearscreen)
![]()
Try This!
Type in a sequence of commands to draw a square
![]()
Sometimes you will give some commands and then find yourself
typing them in again and again. Logo lets you save some typing by
repeating a group of commands.
repeat 5 [fd 70 rt 72]
You can repeat any number of times and use any list of commands
inside the [ and ]
![]()
Try This!
Can you figure out what the repeat command above will draw?
Type it in and see.
![]()
Normally as the turtle moves it leaves a trail. You can change the
color of the trail, called the pen.
In Logo there are lots of possible pen colors that the turtle can use.
Colors are defined by numbers. black is number 0 and
the numbers for more interesting colors are:
setpencolor command, for example:
setpencolor 14
![]()
Try This!
Type in a setpencolor command and
then repeat command above to draw a your favorite
colored shape
![]()
You can also move the turtle without it leaving a trail.
The penup and pendown commands tell the
turtle to raise and lower the pen respectively.
For example, you can draw parallel line segments with this simple
sequence of comands:
   forward 100
   penup
   right 90
   forward 10
   right 90
   pendown
   forward 100
![]()
Try This!
Use in the penup, pendown,
setpencolor and repeat commands
to draw a dashed green line.
![]()
If we've made a nice picture we might want to hide the turtle to get a better
view.
ht (hideturtle)
st (showturtle)
Lots of times our commands are made up of repeating patterns.
An AB pattern alternates between two different parts.
Here is one in Logo:
fd 100 rt 90
Here is an ABC pattern in Logo:
fd 100 bk 100 rt 5
We just use a repeat command to repeat our patterns.
![]()
Try This!
Can you tell what this command will do?
repeat 4 [fd 100 rt 90]
How about this one?
repeat 72 [fd 100 bk 100 rt 5]
![]()
You may want to refer to the number of times the pattern has been
repeated inside of the pattern. This can be done by
using the repcount command.
Since Logo is a computer programming language it has commands to perform mathematical operations:
   2 * 3 = 8 - 2
   8 / 2 = 2 + 2
You can use commands in place of numbers in these mathematical operations.
![]()
Try This!
Can you tell what this command will do?
repeat 10 [fd repcount * 10 rt 90]
Can you change it so that each "edge" has a different color?
![]()
Try to draw some simple polygons using turtle commands. You can do this by repeating the simple pattern of "draw edge"-"turn right", for example:
trianglesrepeat 3 [fd 100 rt 120]squares
repeat 4 [fd 100 rt 90]pentagons
repeat 5 [fd 100 rt 72]
Try This!
How are these different?
How are they the same?
Can you find a general pattern that each of these is a special case of?
hint: use a name like "x" in place of a number and try to calculate the other numbers in terms of "x"
![]()
We can make up our own commands. It saves typing and lets us
experiment with different patterns easily.
Instead of typing repeat 4 [fd 100 rt 90]
for a square every time. We can define a new command:
to square100
repeat 4 [fd 100 rt 90]
end
Now we just give the square100 command.
Here's one for general "regular" polygons of different sizes and colors:
   to poly :sides :length :color
    setpencolor :color
    repeat :sides [fd :length rt 360/:sides]
   end
This command takes numbers as an input, much like the forward
command takes the distance to move the turtle. In the case of a command
that we define, however, we can decide how to use the input value.
These input values are always named with a ":" as their starting character.
Now we can run it as, for example,
poly 4 100 0to draw our black square with sides 100, but we can also run it as:
poly 5 70 14to draw an orange pentagon.
![]()
Try This!
The file poly.lgo has the poly (and
other interesting commands that you can explore). Click this link
and download the file to your machine (e.g., to your desktop).
To load a file, click in the turtle's window, pull down the file menu and select load. You can then select the file you downloaded (e.g., to your desktop) to load into the logo environment.
You can make interesting images by rotating geometric objects.
One simple way is to spin the turtle around a point and draw
a number of polygons (indicated by the :steps input in
the following).
to spin :sides :length :steps
  repeat :steps [poly :sides :length 0 rt 360/:steps]
end
Try
spin 10 30 20and
spin 3 80 10for a start and experiment with others.
If you want to, try to modify the spin command to change
the color of the polygon as well.
![]()
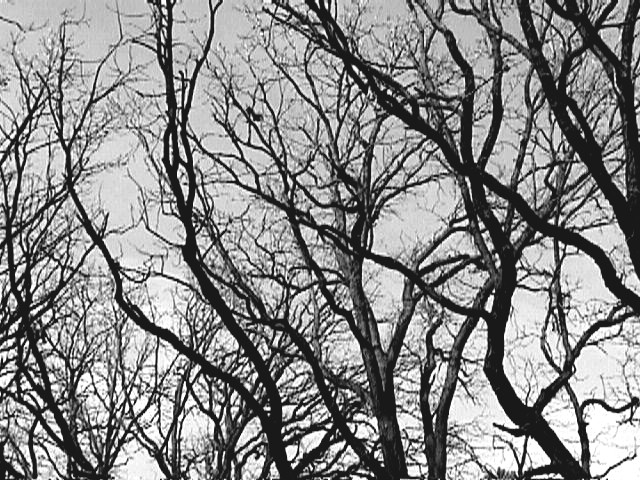
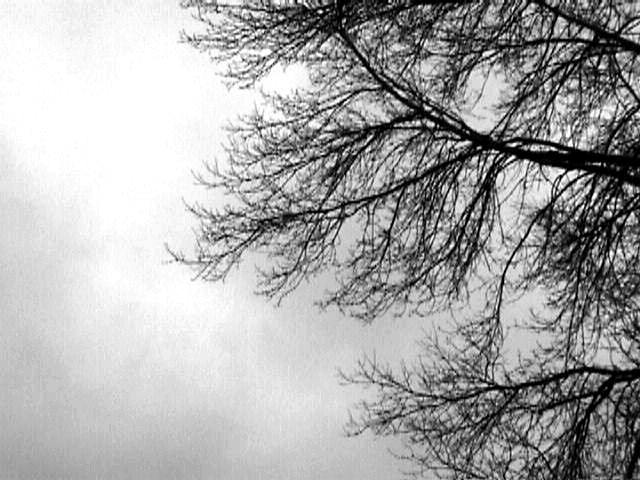
When you look at a tree you see a trunk, some branches, and leaves growing of off the branches.
Say you cut off a branch and push the cut end into the ground. Does it look like a tree?
What is the same? What is different?
Have a look at these trees and these branches. Notice any patterns?
A fractal is a shape that has a repeating pattern, but where occurrences of the pattern change in location and size (often times getting smaller). Mathematicians, scientists, and artists are all interested in the study of fractals.
![]()
Try This!
Look here for a wide variety of fractals. I particularly like the Natural Fractals.
![]()
Trees can be thought of as fractals. The thick trunk leads to thinner branches, in turn each branch can be thought of as a trunk leading to thinner branches.
A very simple tree "shape" can be drawn by the following series of Logo commands. Anything written after a ";" is a comment for you to read, but the computer will ignore it so you don't have to type it in.
   fd 20  ; draw the trunk
   lt 30  ; draw the left branch
   fd 14
   bk 14  ; back up to the branch point
   rt 60  ; draw the right branch
   fd 14
   bk 14  ; backup to the branch point
   lt 30
   bk 20  ; back up to the trunk's base
If you type this in it won't look much like a tree, but this will serve as the basic "fractal" pattern for our trees.
Fractals are programmed in a computer using the idea of recursion. In recursion, we define a command in terms of itself. It seems odd at first, but it is really quite natural. Study this command for drawing a tree trunk and you'll see the idea:
   to trunk :size
     if :size < 5 [stop]
     fd :size
     lt 30
     trunk :size * (7/10)
     rt 60
     trunk :size * (7/10)
     lt 30
     bk :size
   end
It looks very similar to the command sequence we gave above, except that
we use the trunk command itself to draw the left and right
branches. We make the branches smaller than the trunk by multiplying
their size by 7/10. Each time we call trunk
we create a smaller branch, until the size of the "trunk" is less
than 5 at which point we stop and return to construct
the other branches of the tree.
![]()
Try This!
The file tree.lgo has lots of interesting
tree commands including trunk
Try drawing different tree trunks by giving different inputs.
![]()
Trees, and fractals in general, aren't perfectly symmetric like our tree trunks, for example, some times there is a big branch going off the the left and no branch on the right (it may have been blown off in a storm).
We can simulate the seemingly random effects of nature on
the shape of a tree using Logo's random command.
random takes a number as input and then randomly
selects a number between zero and that number (think of it as
rolling dice an returning the number showing on the dice).
When you run the random command with the same number
multiple times it can produce different numbers (!!). For example,
  random 5 = 3
  random 5 = 2
  random 5 = 4
  random 5 = 3
We use this to vary the size of branches as follows:
   to rantrunk :size
     if :size < 5 [stop]
     fd :size
     lt 30
     rantrunk :size * ((5 + (random 4))/10
     rt 60
     rantrunk :size * ((5 + (random 4))/10
     lt 30
     bk :size
   end
This simple change to the way we reduce the size of the branches
has a large effect on the shape of the tree.
![]()
Try This!
Run the rantrunk command several times (clearing the screen)
between each run to see how the shape changes.
Change sizes some to see how the shape changes.
Now run the command several times without clearing the screen. See how the overlapping trees produce a more complex structure. What happens when you vary the sizes?
![]()
These trees are looking better, but we would like to make them more realistic by adjusting the thickness of the trunk and branches and adding leaves.
The thickness of the turtle's pen can be set by the setpensize
command. This command takes a list of two numbers that describe the
height and width of the pen. For example,
setpensize [3 3]makes the pen 3 times thicker.
We want the trunk to be thicker and the branches to be succesively smaller as we move up the tree.
![]()
Try This!
Look at the thicktrunk command to see how the size is
varied. Note that when constructing a list using names rather
than numbers, we have to use (se ...) instead
of [...].
How do the thicktrunk trees look? If you want to
adjust the thickness simply change the :size/6 to
calculate a different fraction of :size.
![]()
Leaves are drawn as an ellipse that is fill with
color. They are drawn at the tips of branches by taking advantage
of the fact that our trunk's will stop growing when :size < 5.
![]()
Try This!
Draw some different trees using the tree command. You
can overlap them if you like and change their size.
If you want to add some fall foliage, try the falltree
command.
![]()
list
of three numbers,
each between 0 and 255, describing
the amount (or intensity) of the red, green, and blue you want. Yellow
is [255 255 0].
One way to see the "shading" of a color is by drawing concentric circles changine the shade of each a small amount. Here's an example:
  to shadesofyellow
   repeat 255 [
    setpencolor (se 255-repcount 255-repcount 0)
    circle 255-repcount
   ]
  end
here we use repcount to get the current repetition. In
addition we use the se command to build the color list
out of the results of calculations
(you can only use [...] when you have simple numbers in
the list).
![]()
Try This!
The file colors.lgo has shadesofyellow
and a simple rainbow command.
It's interesting to see how changes to the calculations for the different color amounts (i.e., the red, green and blue) changes the resulting color. If you want to change the command definition go ahead.
![]()
You might wish to sign it first. The easiest way to do this is to type:
   penup
   setxy -200 -200
   setpencolor 10
   pendown
   rt 90
   label [FirstName LastName]
Then go to the bitmap menu, pull down to print, and select
HP Color.